Troubleshooting Guides for the CS aerotherm Bread Moulder

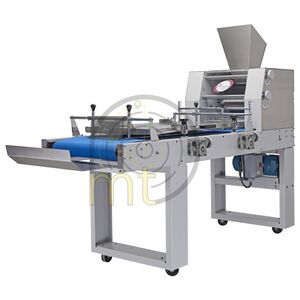
The Long Moulder is designed for moulding long loaves of bread and rusk toast. It’s sturdy construction makes the machine suitable for use in automatic and semi automatic bread and rusk production plants. We offer a compact and competent range of Long Moulders with Teflon coated rollers that prevent dough from sticking.
Casters make the machine operate silently. You can choose between SS and MS for the body frame. Moulding tables and side guards can be changed swiftly. It has safety assurance of CE standards. Centring rollers are provided to ensure that dough falls exactly in the middle and passes through the Teflon coated rollers.
Replacing Motor
To replace the motor, following needs to be done.
- Switch off the machine and ensure there is no power.
- Locate the motor under the long moulder.
- Remove the Chain attached to the motor.
- Remove the Motor mounting nuts using the appropriate tool.
- Replace the old motor with the new one.
- Put the mounting nuts back on the motor.
- Connect the Chain back to the motor.
Replacing the Roller
To replace the roller, follow the below mentioned steps.
- Switch off the machine and ensure there is no power.
- Remove the side cover.
- Pull up the Spring loaded tensioner pulley.
- Remove the Timer Belt.
- Dismantle the Timer Pulley.
- Dismantle the roller mounting flanges with bearings.
- From the other side, turn the knobs and remove the cover.
- Dismantle the gear, mounting flange with bearing.
- Now, you can remove the rollers.
- Put the new rollers in the given slots.
- Assemble the gear, mounting flange with bearing.
- Put the cover back and tighten the knobs.
- On the other side, assemble the roller mounting flanges with bearings.
- Assemble the Timer Pulley and Timer Belt by pulling up the spring loaded tensioner pulley.
- Put the side cover back
Replacing the Timer Belt
To replace the timer belt, following needs to be done.
- Switch off the machine and ensure there is no power.
- Remove the side cover.
- Pull up the Spring loaded tensioner pulley.
- Remove the Timer Belt.
- Put a new Timer Belt by pulling up the Spring loaded tensioner pulley.
- Put the side cover back.
MPCB Trip and Replacement
To change the MPCB for the CS aerotherm Bread Moulder, the following needs to be done:
- Switch off the CS aerotherm Bread Moulder and unplug the Slicer and ensure there is no power.
- Remove the back cover using 6 mm allen key.
- Locate the MPCB at the left side of the machine when looking at the machine from the back.
- If the MPCB is in the down (trip) position, push it upwards to un trip it.
- If the MPCB comes back to the down (trip) position, then the MPCB needs to be replaced.
- Ensure the CS aerotherm Bread Moulder is unplugged.
- Remove the connections to the MPCB from the top of the MPCB. Keep in mind the colour coding.
- The top of the MPCB has a colour coding (from left to right).
- Loosen the clip from the above, push the MPCB up to remove the MPCB.
- Please replace with the same make and model of the MPCB. The specifications of the MPCB are: Schneider Make GV2 MPCB Range of 1-1.6A.
- Once removed, put the new MPCB in place by clipping the top first, and moving it down.
- Ensure it's locked in place.
- Once locked, connect the wires on top and at the bottom in the same place as it was before removing.
- Ensure the wires are connected tightly.
- Plug the machine back into the socket and switch it on.
- The CS aerotherm Bread Moulder is ready to use.
Replacing The Emergency Switch
To change the switch, the following needs to be done:
- Switch off the CS aerotherm Bread Moulder and unplug the machine and ensure there is no power.
- Open the control panel on the side by removing the lock.
- Remove the connections for the Emergency switch using a tester. Please note the connections.
- Unscrew the switch by loosening the 2 screws on the switch using a tester and remove the emergency switch from the panel by turning it anti-clockwise.
- Put the new emergency switch in place of this and rotate it clockwise to ensure it's tight.
- The ratings for the emergency switch are 10A 415V with a dia of 22mm.
- Connect the new connections in the same colour coding and place it as removed from.
- Close the electrical panel cover and lock the same.
- Plug the CS aerotherm Bread Moulder back into the socket and switch it on.
Replacing Starter
To replace the starter, please follow the below mentioned steps.
- Switch off the machine.
- Open the Starter Box located underneath the moulder.
- Note down the colour coding of the wires and then disconnect the wires.
- Remove the old starter and put a new one in its place.
- Connect the wires with the same colour code.
- Close the Starter Box.
